When you connect to your database, you consume server resources. If you have a lot of connections to your database, you can consume a lot of server resources. One way to mitigate this is to use connection pooling, which allows you to have high numbers of connections, but keep your server resource use low. The more client connections you have to your database, the more useful connection pooling becomes.
By default, PostgreSQL creates a separate backend process for each connection to the server. Connection pooling uses a tool called PGBouncer to pool multiple connections to a single backend process. PGBouncer automatically interleaves the client queries to use a limited number of backend connections more efficiently, leading to lower resource use on the server and better total performance.
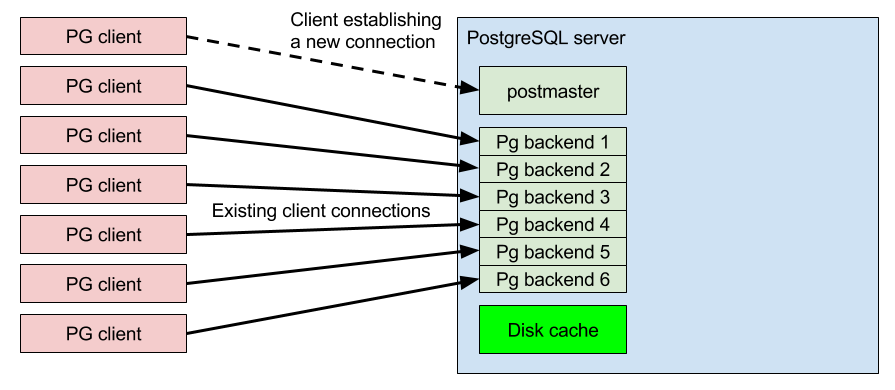
Without connection pooling, the database connections are handled directly by PostgreSQL backend processes, one process per connection:
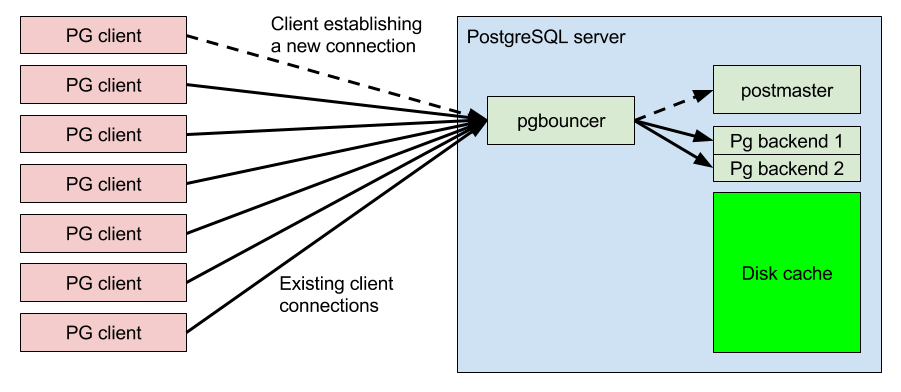
When you add connection pooling, fewer backend connections are required. This frees up server resources for other tasks, such as disk caching:
Connection pooling allows you to handle up to 5000 database client connections simultaneously. You can calculate how many connections you can handle by the number of CPU cores you have available. You should have at least one connection per core, but make sure you are not overloading each core. A good number of connections to aim for is three to five times the available CPU cores, depending on your workload.
There are several different pool modes:
- Transaction (default)
- Session
- Statement
This is the default pooling mode. It allows each client connection to take turns using a backend connection during a single transaction. When the transaction is committed, the backend connection is returned back into the pool and the next waiting client connection reuses the same connection immediately. This provides quick response times for queries as long as the most transactions are performed quickly. This is the most commonly used mode.
This mode holds a client connection until the client disconnects. When the client disconnects, the server connection is returned back into the connection pool free connection list, to wait for the next client connection. Client connections are accepted at TCP level, but their queries only proceed when another client disconnects and frees up the backend connection back into the pool. This mode is useful when you require a wait queue for incoming connections, while keeping the server memory usage low. However, it is not useful in most common scenarios because the backend connections are recycled very slowly.
This mode is similar to the transaction pool mode, except that instead of allowing a full transaction to be run, it cycles the server side connections after each and every database statement (SELECT, INSERT, UPDATE, DELETE, for example). Transactions containing multiple SQL statements are not allowed in this mode. This mode is best suited to specialized workloads that use sharding front-end proxies.
You can set up a connection pool from the Managed Service for TimescaleDB portal. Make sure you have already created a service that you want to add connection pooling to.
- In MST Portal, navigate to the
Serviceslist, and click the name of the service you want to add connection pooling to. - In the
Service overviewpage, navigate to thePoolstab. When you have created some pools, they are shown here. - Click
Add Poolto create a new pool. - In the
Create New Connection Pooldialog, use these settings:- In the
Pool namefield, type a name for your new pool. This name becomes the databasedbnameconnection parameter for your pooled client connectons. - In the
Databasefield, select a database to connect to. Each pool can only connect to one database. - In the
Pool Modefield, select which pool mode to use. - In the
Pool Sizefield, select the maximum number of server connections this pool can use at any one time. - In the
Usernamefield, select which database username to connect to the database with.
- In the
- Click
Createto create the pool, and see the details of the new pool in the list. You can clickInfonext to the pool details to see more information, including the URI and port details.

Note
Pooled servers use a different port number than regular servers. This allows you to use both pooled and un-pooled connections at the same time.
Keywords
Found an issue on this page?Report an issue or Edit this page in GitHub.