This guide illustrates the process of migrating a Postgres database from an
AWS RDS service to a Timescale instance. We will use Postgres community tools
like pg_dump and pg_restore to facilitate the migration process.
Migrating data using pg_dump requires a period of downtime for your production database, the duration of which is proportional to the size of your database. Your applications will not be able to write to your production database during the migration process. If you want a migration solution from your RDS instance to Timescale that offers low downtime, please refer to AWS RDS to Timescale using live migration

Note
In the context of migrations, your existing production database is referred to as the "source" database, while the new Timescale database that you intend to migrate your data to is referred to as the "target" database.
Before initiating the migration process, you will require:
- Details of your AWS RDS instance
- Intermediate machine
You will need the following information about your Postgres RDS instance:
- Endpoint
- Port
- Master username
- Master password
- VPC
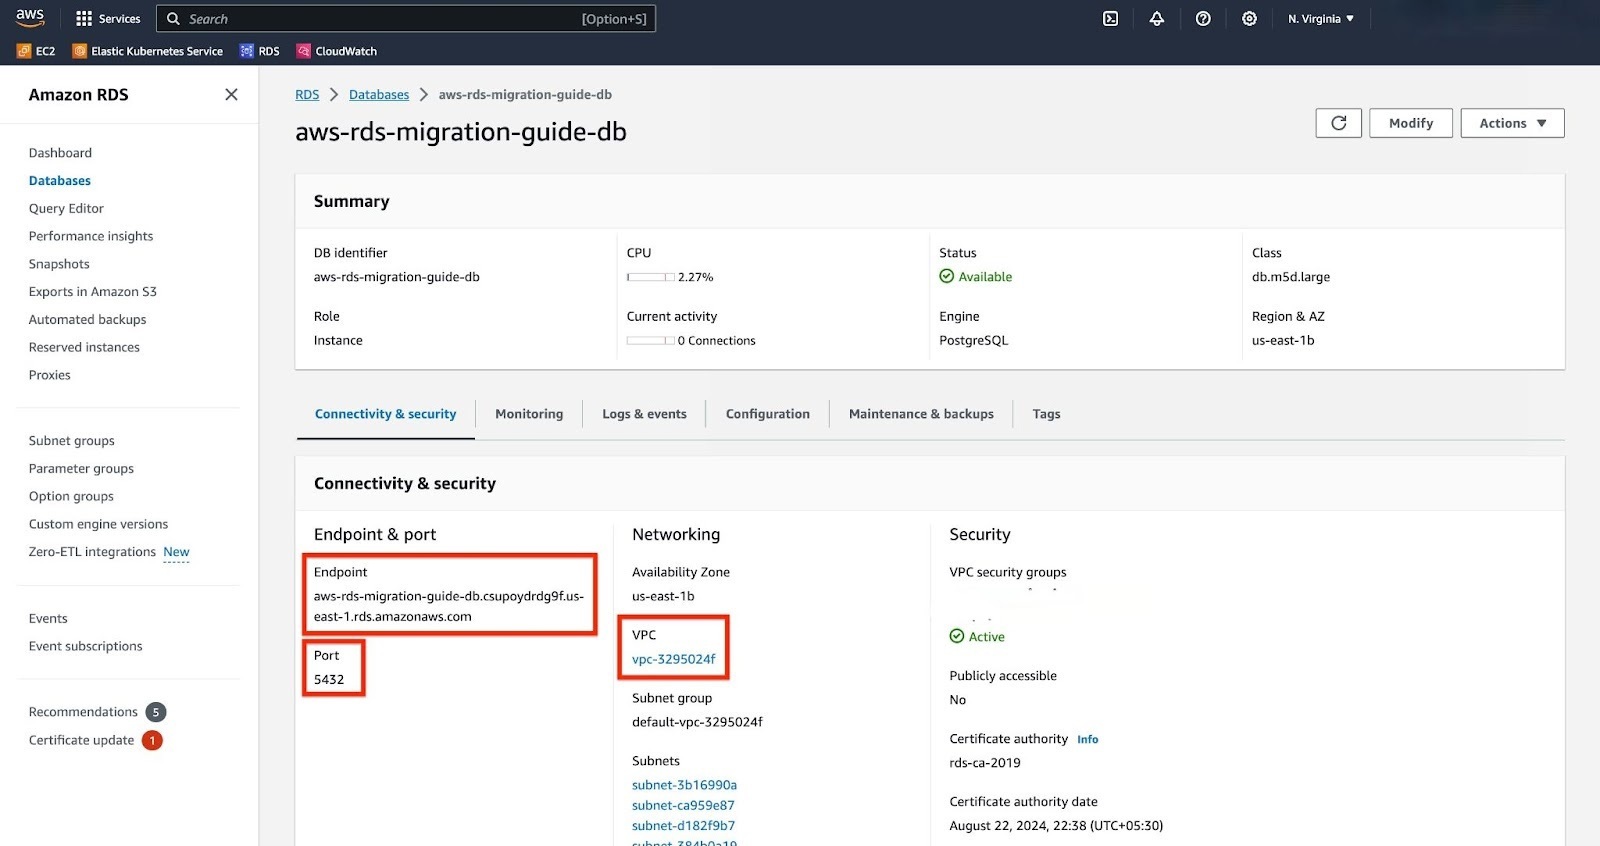
To gather the required information, navigate to the "Databases" panel and select your RDS instance.
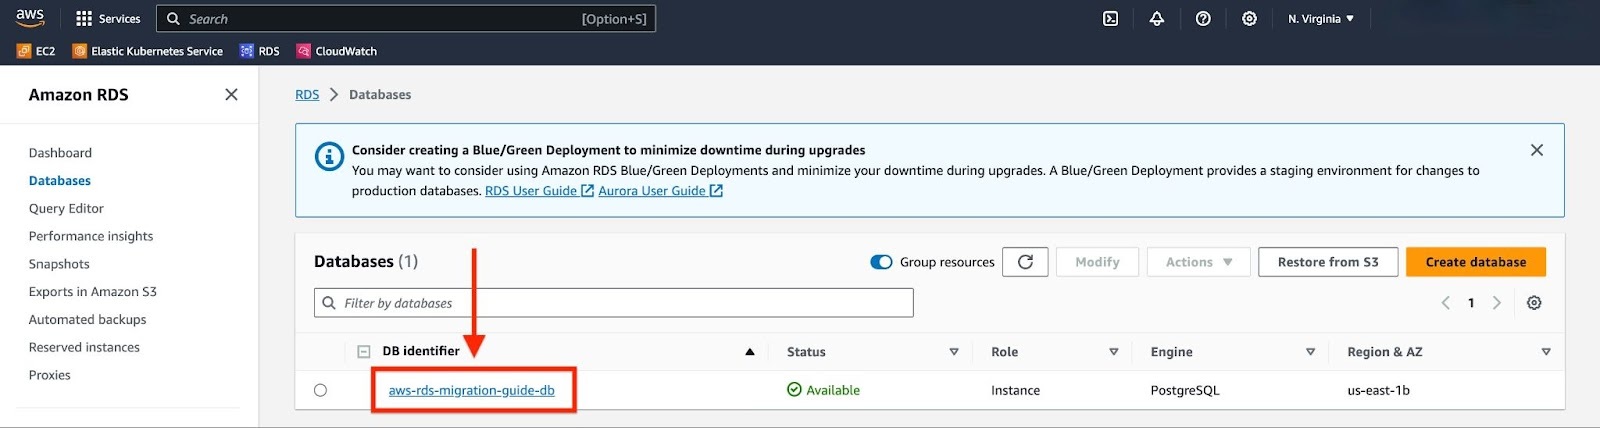
Record the Endpoint, Port, and VPC details from the "Connectivity & Security" tab, and the Master Username from the "Configuration" tab. Remember to use the Master Password that was supplied when the Postgres RDS instance was created.

In order to execute pg_dump and pg_restore, we need an EC2 instance. This
instance should have access to your RDS service. Therefore, we will set up the EC2
machine in the same VPC as the RDS service.
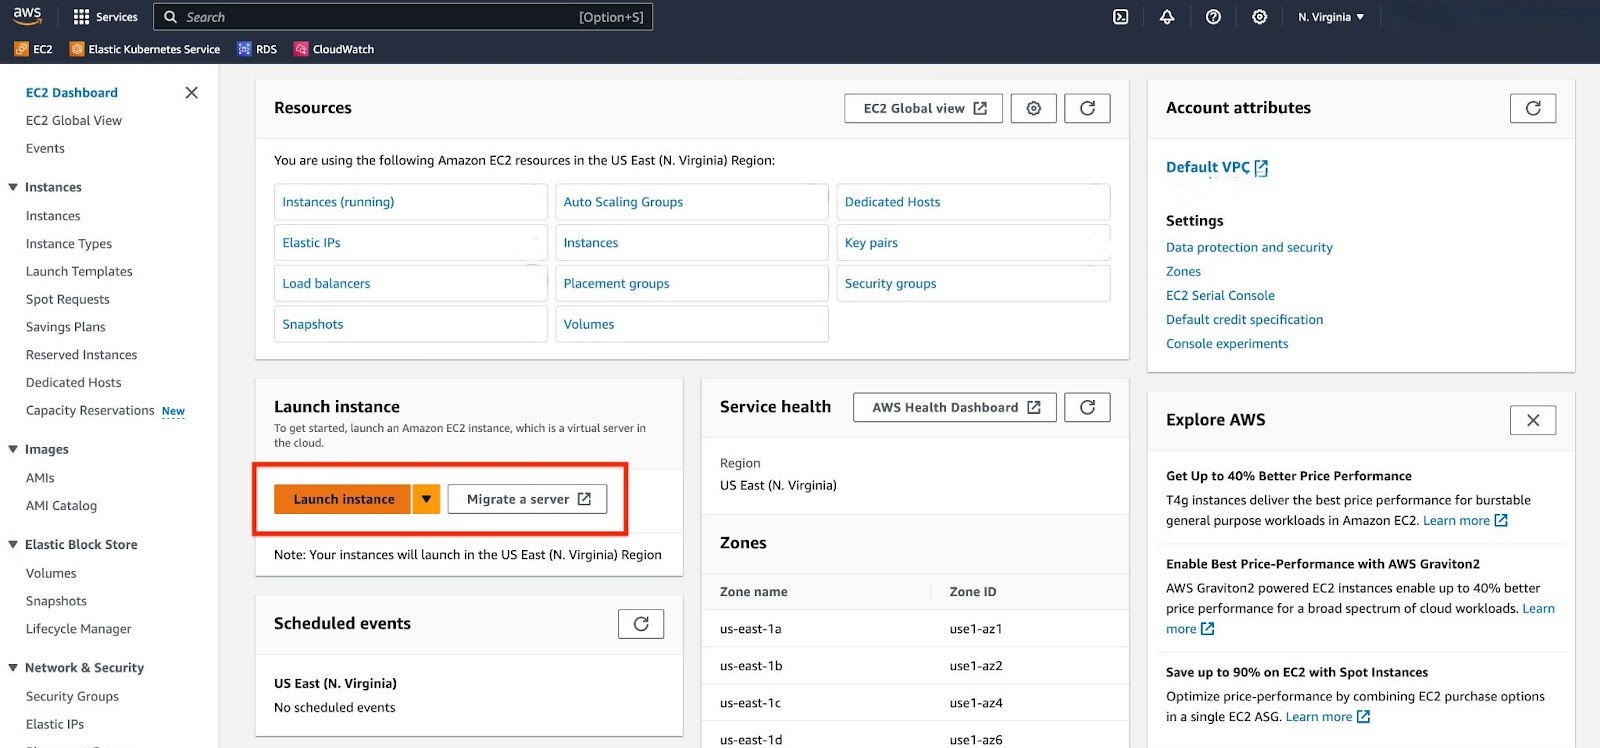
In the AWS search, type "EC2" and select the "EC2" option under services.

Click on "Launch instance".
Configure your EC2 instance.
a. For "Application and OS image", choose Ubuntu Server LTS.
b. For "Instance type", use 2 CPU and 8 GB memory at least. If your migration involves a larger database, you should choose accordingly.

c. For "Key pair", you can choose to use an existing key pair or create a new one. This will be necessary when connecting to the EC2 instance from your local machine.
d. For "Network Settings", select the same VPC that your RDS instance is located in. Also, modify the "Source Type" of the security group to "My IP" so that your local machine can connect to the EC2 instance.
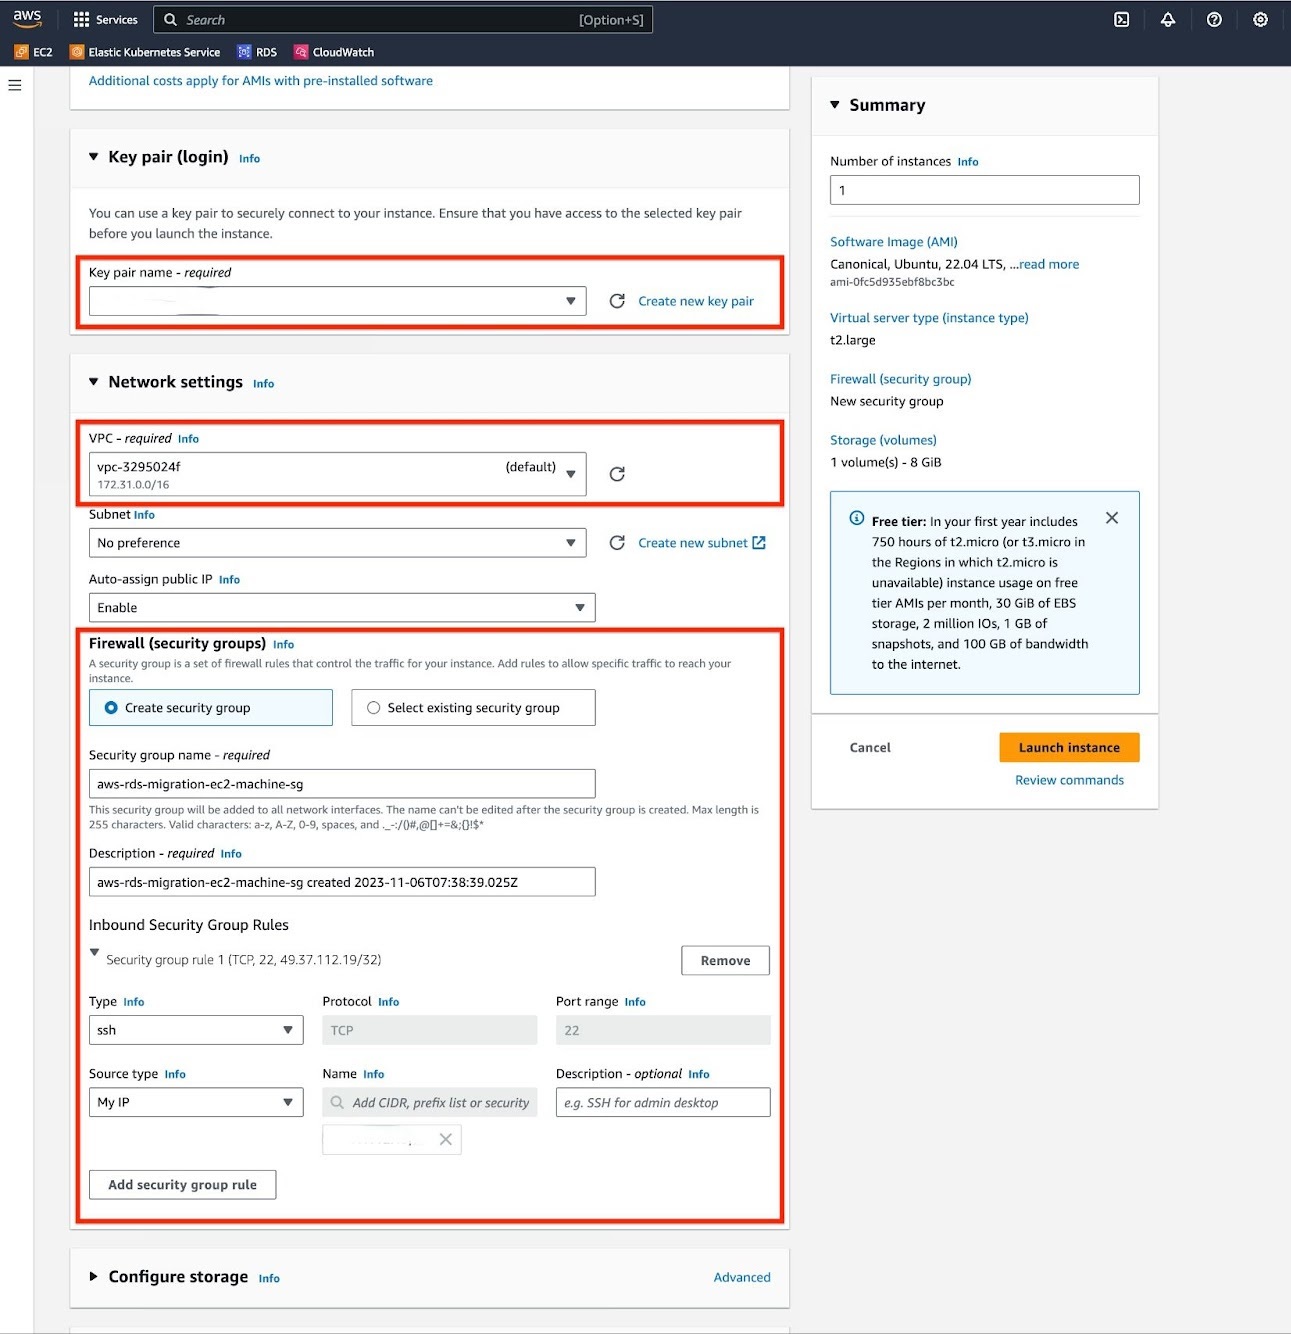
e. For "Configure Storage" section, adjust the volume size to match the size of your database. If necessary, you should enable encryption on your volume.
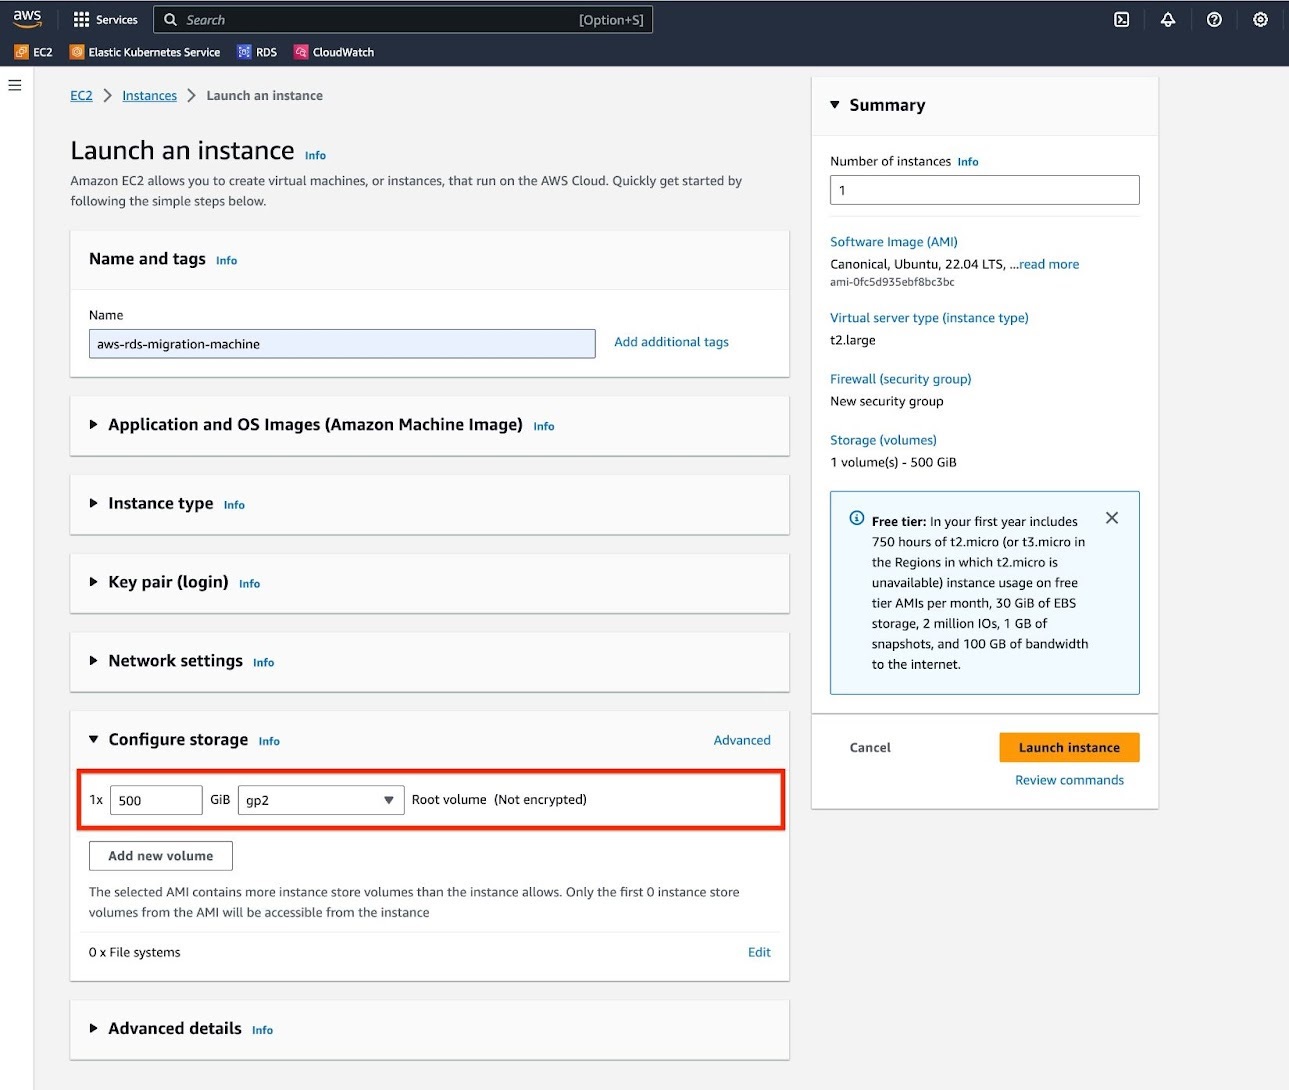
Review the summary of the instance and click "Launch instance".

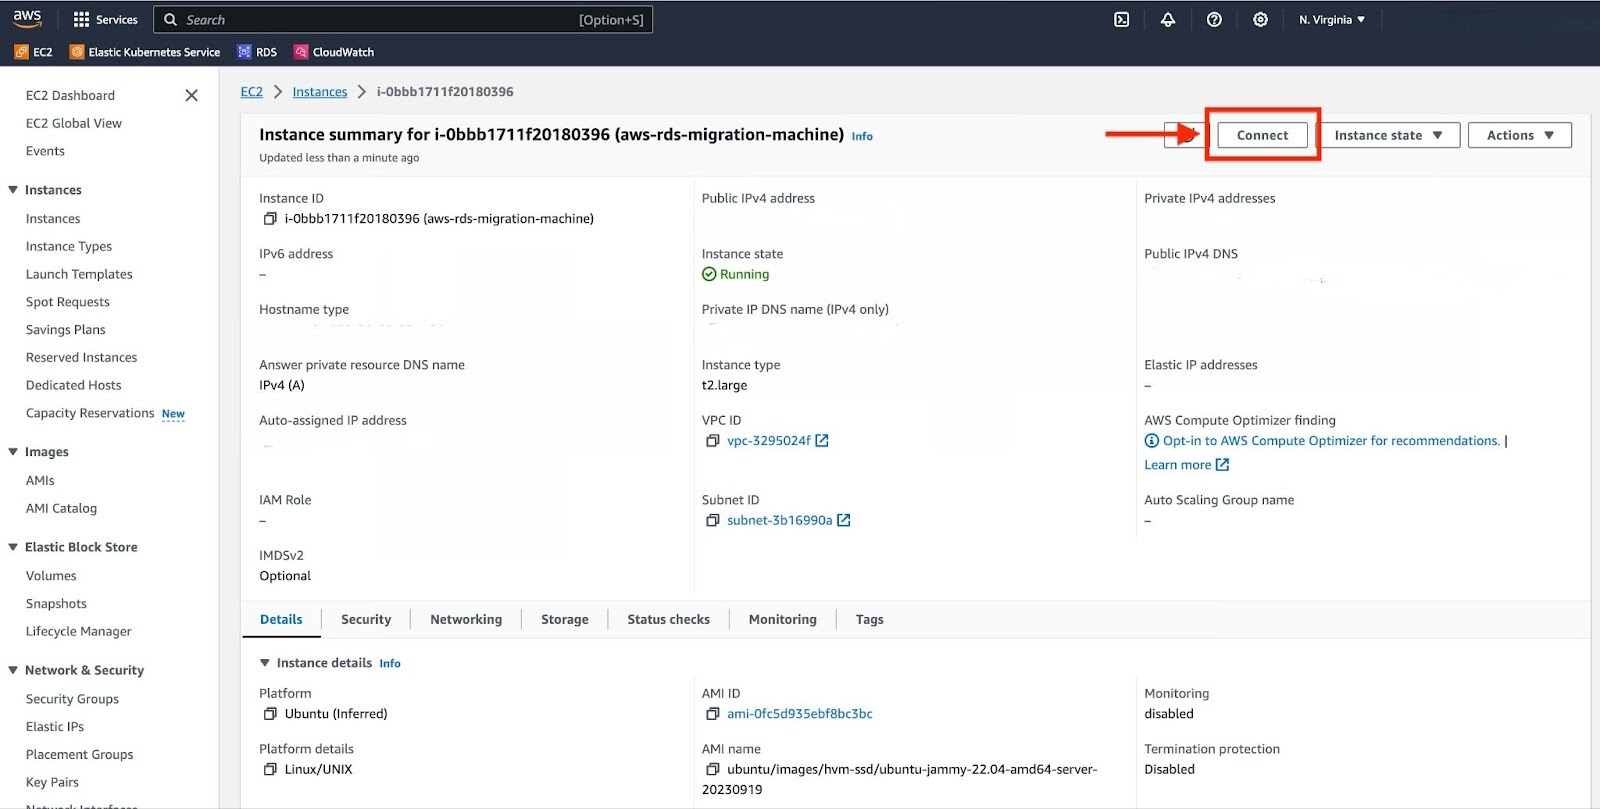
To prepare your EC2 instance for migration:
Navigate to your EC2 instance and click on the "Connect" button.
Select the "SSH client" tab.

Connect to your EC2 instance using the "Key pair" downloaded in the previous step.
chmod 400 <key-pair>.pemssh -i "<key-pair>.pem" ubuntu@<EC2 instance's Public IPv4>
- Install PostgreSQL client.
sudo sh -c 'echo "deb http://apt.postgresql.org/pub/repos/apt $(lsb_release -cs)-pgdg main" > /etc/apt/sources.list.d/pgdg.list'wget -qO- https://www.postgresql.org/media/keys/ACCC4CF8.asc | sudo tee /etc/apt/trusted.gpg.d/pgdg.asc &>/dev/nullsudo apt updatesudo apt install postgresql-client-15 -y # "postgresql-client-16" if your source DB is using PG 16.psql --version && pg_dump --version
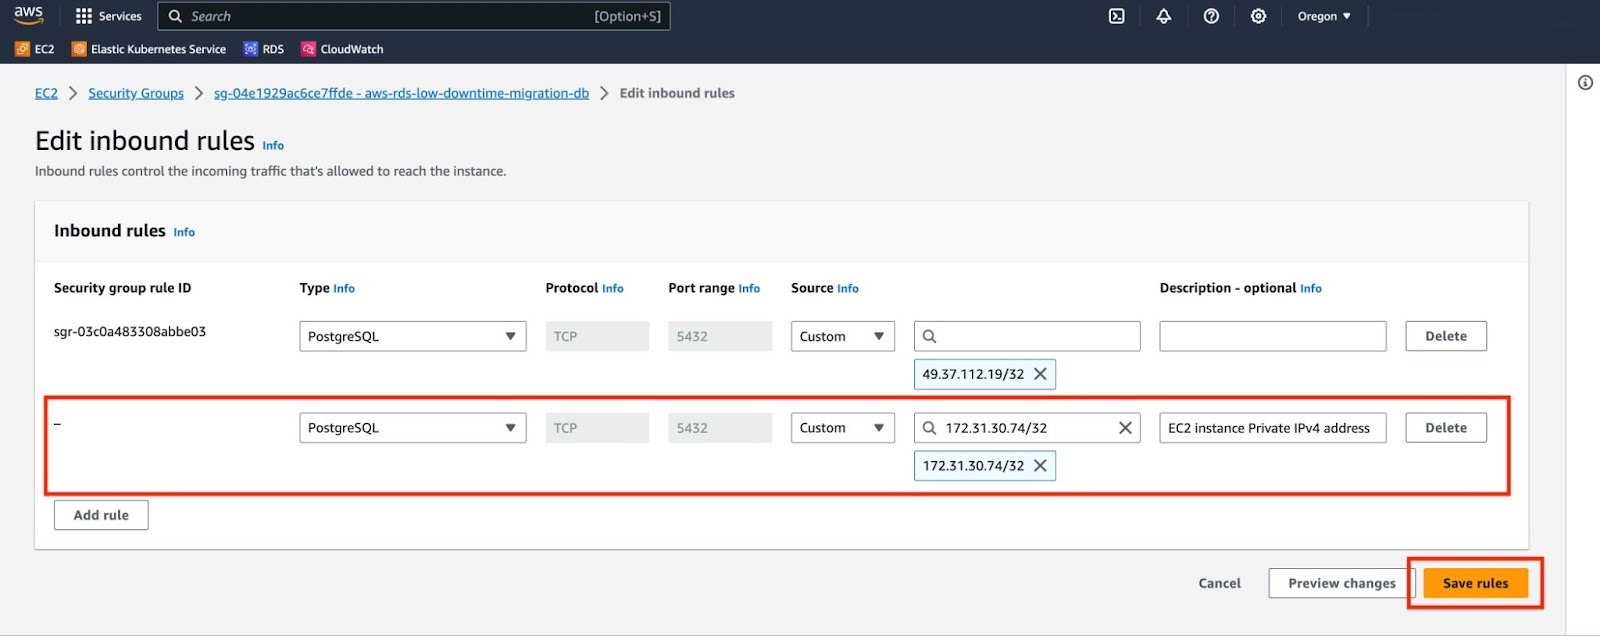
To allow an EC2 instance to connect to an RDS instance, you need to modify the security group associated with your RDS instance.
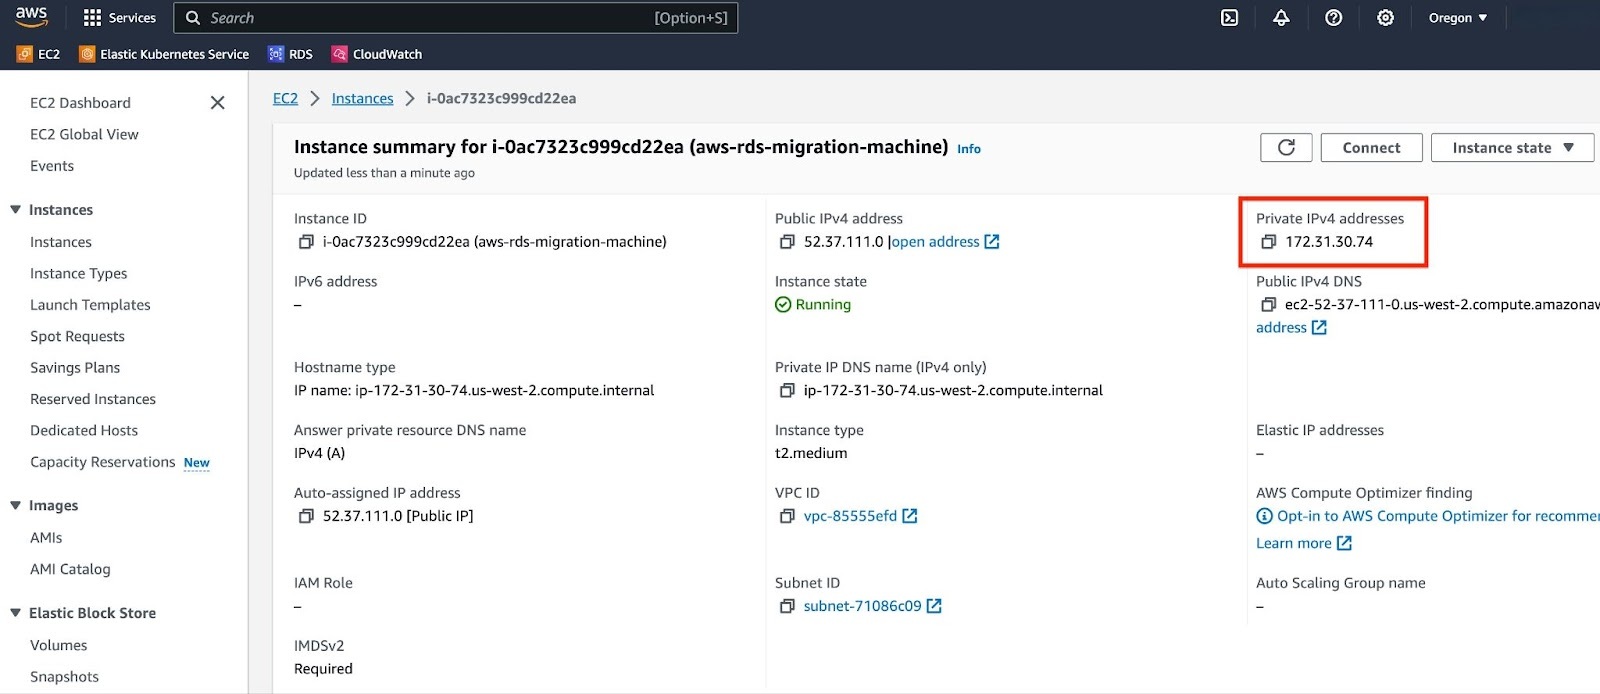
a. Note the Private IPv4 address of your EC2 instance.
b. Go to the security group associated with your RDS instance and select "Edit inbound rules".
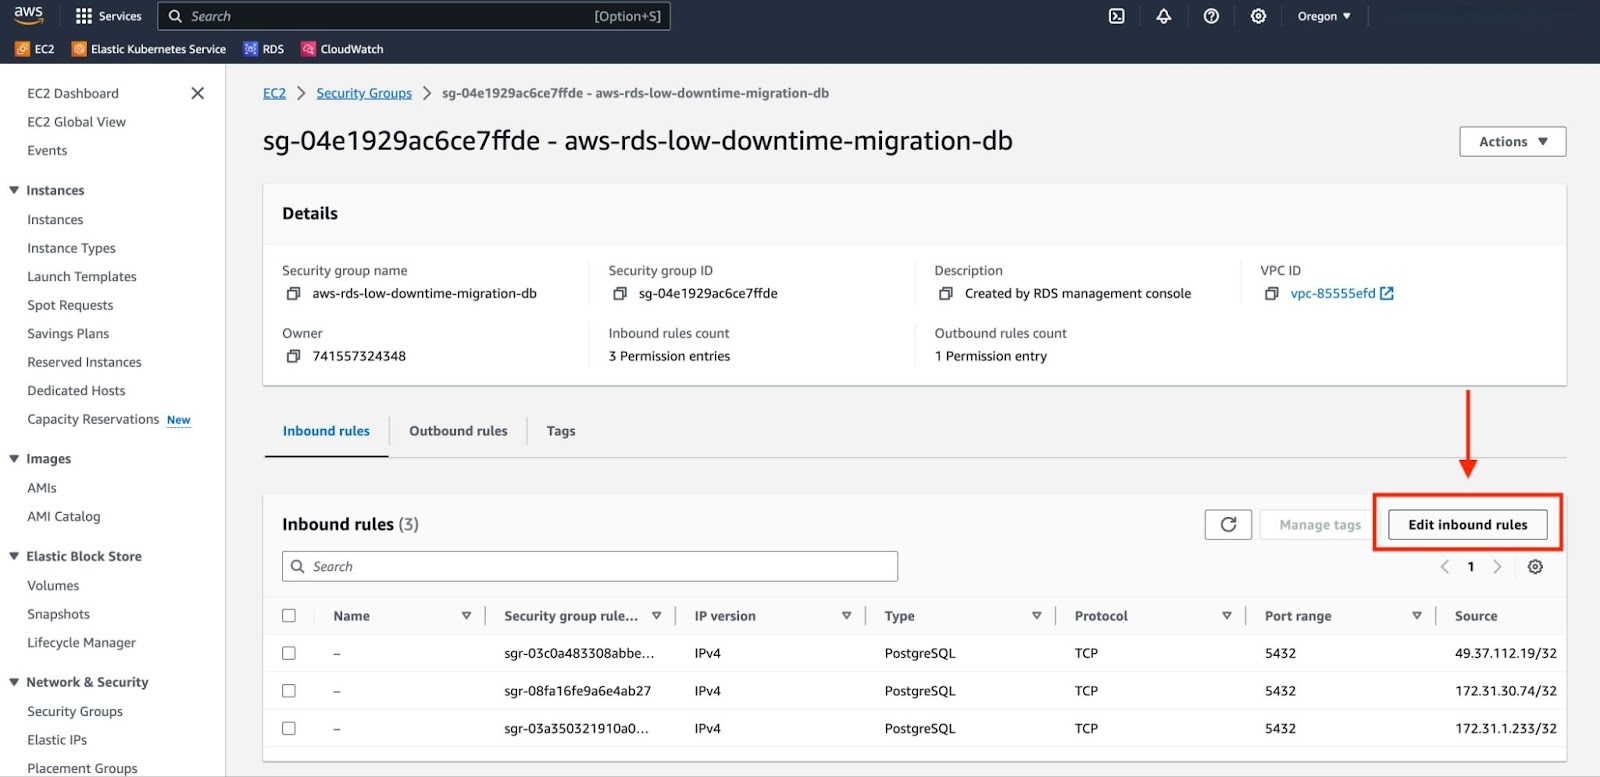
c. Choose "Add rule". In the "Type" field, select "PostgreSQL". For "Source", select "Custom" and input the Private IPv4 address of your EC2 instance. Add a suitable description for this rule. Finally, click on "Save rules" to apply the changes.
Verify the connection to the RDS service from your EC2 instance. Please note, you will be prompted to enter the master password. This should be the same password that you used when creating your AWS RDS service.
# psql -h <rds_endpoint> -p <rds_port> -U postgres -c "select 1"psql -h aws-rds-migration-guide-db.csupoydrdg9f.us-east-1.rds.amazonaws.com -p 5432 -U postgres -c "select 1"Password for user postgres:?column?----------1(1 row)

Tip
If you get stuck, you can get help by either opening a support request, or take
your issue to the #migration channel in the community slack,
where the developers of this migration method are there to help.
You can open a support request directly from the Timescale console, or by email to support@timescale.com.
The migration process consists of the following steps:
- Set up a target database instance in Timescale.
- Migrate roles and schema from source to target.
- [optional] Enable TimescaleDB Hypertables.
- Migrate data from source to target.
- Verify data in target by comparing with source.
Create a database service in Timescale.
If you intend on migrating more than 400 GB, open a support request to ensure that enough disk is pre-provisioned on your Timescale instance.
You can open a support request directly from the Timescale console, or by email to support@timescale.com.
Before starting the migration process, you should ensure that your source database is not receiving any DML queries. This is important to guarantee a consistent migration and to ensure that the resulting database accurately reflects your source database.

Important
For a consistent migration of data from source to target, your production applications should not be writing to your source database (i.e., they will have to undergo a downtime), otherwise, the data written to the source database after starting the migration process will not be present on the target database.
If you want to write to your source database during the migration process, please refer to the live-migration playbook.
pg_dumpall -d "$SOURCE" \--quote-all-identifiers \--roles-only \--no-role-passwords \--file=roles.sql
Important
AWS RDS does not permit dumping of roles with passwords, which is why the above command is executed with the --no-role-passwords. However, when the migration of roles to your Timescale instance is complete, you need to manually assign passwords to the necessary roles using the following command: ALTER ROLE name WITH PASSWORD 'password';
Timescale services do not support roles with superuser access. If your SQL dump includes roles that have such permissions, you'll need to modify the file to be compliant with the security model.
You can use the following sed command to remove unsupported statements and
permissions from your roles.sql file:
sed -i -E \-e '/CREATE ROLE "postgres";/d' \-e '/ALTER ROLE "postgres"/d' \-e '/CREATE ROLE "rds/d' \-e '/ALTER ROLE "rds/d' \-e '/TO "rds/d' \-e '/GRANT "rds/d' \-e 's/(NO)*SUPERUSER//g' \-e 's/(NO)*REPLICATION//g' \-e 's/(NO)*BYPASSRLS//g' \-e 's/GRANTED BY "[^"]*"//g' \roles.sql
Note
This command works only with the GNU implementation of sed (sometimes referred to as gsed). For the BSD implementation (the default on macOS), you need to add an extra argument to change the -i flag to -i ''.
To check the sed version, you can use the command sed --version. While the
GNU version explicitly identifies itself as GNU, the BSD version of sed
generally doesn't provide a straightforward --version flag and simply outputs
an "illegal option" error.
A brief explanation of this script is:
CREATE ROLE "postgres"; andALTER ROLE "postgres": These statements are removed because they require superuser access, which is not supported by Timescale.(NO)SUPERUSER|(NO)REPLICATION|(NO)BYPASSRLS: These are permissions that require superuser access.CREATE ROLE "rds,ALTER ROLE “rds,TO "rds,GRANT "rds: Any creation or alteration of rds prefixed roles are removed because of their lack of any use in a Timescale instance. Similarly, any grants to or from "rds" prefixed roles are ignored as well.GRANTED BY role_specification: The GRANTED BY clause can also have permissions that require superuser access and should therefore be removed. Note: Per the TimescaleDB documentation, the GRANTOR in the GRANTED BY clause must be the current user, and this clause mainly serves the purpose of SQL compatibility. Therefore, it's safe to remove it.
pg_dump -d "$SOURCE" \--format=plain \--quote-all-identifiers \--no-tablespaces \--no-owner \--no-privileges \--section=pre-data \--file=pre-data-dump.sql \--snapshot=$(cat /tmp/pgcopydb/snapshot)
--section=pre-datais used to dump only the definition of tables, sequences, check constraints and inheritance hierarchy. It excludes indexes, foreign key constraints, triggers and rules.--snapshotis used to specified the synchronized snapshot when making a dump of the database.
--no-tablespacesis required because Timescale does not support tablespaces other than the default. This is a known limitation.--no-owneris required because Timescale'stsdbadminuser is not a superuser and cannot assign ownership in all cases. This flag means that everything is owned by the user used to connect to the target, regardless of ownership in the source. This is a known limitation.--no-privilegesis required because Timescale'stsdbadminuser is not a superuser and cannot assign privileges in all cases. This flag means that privileges assigned to other users must be reassigned in the target database as a manual clean-up task. This is a known limitation.
psql -X -d "$TARGET" \-v ON_ERROR_STOP=1 \--echo-errors \-f roles.sql \-f pre-data-dump.sql
Before restoring data from your source database, you might consider converting standard Postgres tables into TimescaleDB Hypertables. This stage of the migration process presents an optimal opportunity for such a conversion. Essentially, you’ll want to transform Postgres tables that contains time series data. For each table that you plan to convert into a Hypertable in the target database, execute the following command:
psql -X -d "$TARGET" \-v ON_ERROR_STOP=1 \-c "SELECT create_hypertable('<table name>', '<time column name>')"
A more detailed explanation can be found in the hypertable documentation. Once the table is converted, you can follow the guides to enable more Timescale features like retention and compression.
Important
This step is optional, but we strongly recommend that you perform it now.
While it is possible to convert a table to a Hypertable after the migration is complete, this requires effectively rewriting all data in the table, which locks the table for the duration of the operation and prevents writes.
Using pg_dump, dump the data from source database into intermediate storage
pg_dump -d "$SOURCE" \--format=plain \--quote-all-identifiers \--no-tablespaces \--no-owner \--no-privileges \--data-only \--file=dump.sql
pg_dump -d "$SOURCE" \--format=plain \--quote-all-identifiers \--no-tablespaces \--no-owner \--no-privileges \--section=post-data \--file=post-data-dump.sql \--snapshot=$(cat /tmp/pgcopydb/snapshot)
--section=post-datais used to dump post-data items include definitions of indexes, triggers, rules, and constraints other than validated check constraints.--snapshotis used to specified the synchronized snapshot when making a dump of the database.
--no-tablespacesis required because Timescale does not support tablespaces other than the default. This is a known limitation.--no-owneris required because Timescale'stsdbadminuser is not a superuser and cannot assign ownership in all cases. This flag means that everything is owned by the user used to connect to the target, regardless of ownership in the source. This is a known limitation.--no-privilegesis required because Timescale'stsdbadminuser is not a superuser and cannot assign privileges in all cases. This flag means that privileges assigned to other users must be reassigned in the target database as a manual clean-up task. This is a known limitation.
Restore the dump file to Timescale instance
psql -d $TARGET -v ON_ERROR_STOP=1 --echo-errors \-f dump.sql \-f post-data-dump.sql
Update the table statistics by running ANALYZE on all data
psql -d $TARGET -c "ANALYZE;"
Verify that the data has been successfully restored by connecting to the target database and querying the restored data.
Once you have verified that the data is present, and returns the results that you expect, you can reconfigure your applications to use the target database.
Keywords
Found an issue on this page?Report an issue or Edit this page in GitHub.